Findings
Findings overview
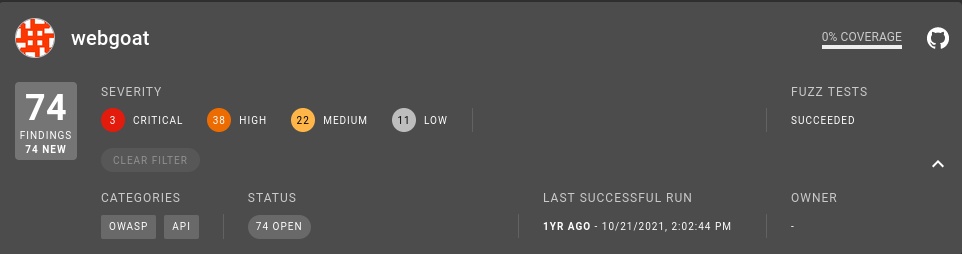
For a given run, CI Sense displays the total number of
findings and the quantities for each severity: Critical, High, Medium, and Low.
Select any of those to filter for the findings you are most interested in
viewing. There may also be categories depending on the specific findings
discovered during the fuzz run.
Severity
Each finding discovered by CI Sense has a severity score, a numerical
score in the range 0.1 - 10.0 and an associated classification. The
severity score and severity classification use the same values as
CVSS to enable you to
easily integrate with other processes and tools that recognize this standard.
| Severity Score | Severity Classification |
|---|---|
| 0.1 - 3.9 | Low |
| 4.0 - 6.9 | Medium |
| 7.0 - 8.9 | High |
| 9.0 - 10.0 | Critical |
Source of severity
The severity score and severity classification provided by CI Sense
represent the importance of a finding. This score hinges on the nature of the
bug or vulnerability in a generic context. The score doesn't account for the
specifics of a given vulnerability such as the number of versions affected, ease
of exploitation, etc.
Finding categories
Findings may have additional categories indicating it belongs to a group of findings. These categories are:
- OWASP - the finding belongs to the OWASP Top 10.
- External - the finding using the fuzzer input was confirmed by ZAP. These findings, since they solely base on the input and don't trigger by the fuzzer, don't contain a detailed stack trace or line numbers.
- Regression - the finding had been marked as fixed but has now reoccurred. False positives may occur if you don't execute all tests in the current or previous run or if you modify tests.
- API - You get finding with an “API” category by running a Web API fuzzing test. Depending on the availability of the API under test, this type of issue may be one that can be readily exploitable by anyone with the same access.
Manage findings
Select and filter findings
You can view findings for a specific project by clicking on Findings on the
left sidebar. For a given run, CI Sense displays the total number of
findings and the quantities for each severity: Critical, High, Medium, and Low.
Select any of those to filter for the findings you are most interested in
viewing. There may also be categories depending on the specific findings
discovered during the fuzz run.
Manage your findings
CI Sense provides capabilities to help you manage your findings so you can properly triage, track, and ultimately fix them.
View findings for a specific project
You can asses the list of current findings for a specific project
trough the Dashboard. It contains all available project cards in
the left pane near the top.
Select the project from the dropdown menu in the left pane,
below Dashboard and then click either Overview or Findings
in the left pane.
There are three aspects you can see in the overview of current findings for a given project:
The overview provides a clear view of:
- The current number of findings, total and new.
- The
severity classificationof these findings. - The
categoriesassociated with the findings.

You can click the severity classification or one of the categories to
quickly filter for the findings you consider highest priority.
Clicking one of the filters or on the project pane itself shows you the list of findings. Click a specific finding to obtain additional information.

Finding status
A finding can have 1 of 3 different states: Open, Assessed, or Ignored.
You can adjust these by selecting the Action dropdown on the right side.
- An
openfinding indicates this finding wasn't processed in any way. If the fuzzer discovers this finding in the future, it reports it again. - An
assessedfinding is one that's currently analyzed. Assessed findings prevent the fuzzing run from failing when rediscovering them, but you still receive an alert about the finding. ignoredstatus is for any findings you consider unnecessary to fix for whatever reason. The fuzzer doesn't report this finding if it encounters it again.
Type and ID
The type of the finding, for example Stack Buffer Overflow, SQL Injection, or others and an
identifier used by CI Sense.
Location
This column contains the location where the fuzzer discovered the finding.
Download your findings
You can download the findings as a PDF, Word document, or Excel document. Click
on the ![]() located over the actual findings.
located over the actual findings.
Link to ticket system
CI Sense can link to external ticket systems to help manage the remediation
process for a finding. Under the Action menu on the right of the finding,
click
![]() ,
paste the URL of the created issue from Jira, GitHub, or others and click Link.
,
paste the URL of the created issue from Jira, GitHub, or others and click Link.
View details for a finding
When you expand a finding in the bottom pane (by clicking the > on the left
side of a finding), it contains 3 tabs with different information: Debug,
Description, and Log. These tabs contain several pieces of information that
can help you determine the root cause of the finding.
- The
debugtab contains the fuzz test responsible for the finding, the source line, the stack trace (if available), and the crashing input. - The
descriptiontab contains theseverity score, a short description of the finding, and possibly some links to additional information about this type of finding. - The
logtab content depends on the type of fuzzing that discovered the finding. If the finding is from unit fuzzing, then the output is output directly from the fuzzer. If the finding is from Web API fuzzing, then the output contains the API request responsible for triggering the finding.